# 如何设置Proxy302代理

设置Proxy302代理（<https://www.proxy302.com/>）需要科学上网后使用，若没有科学上网，请参考**非海外环境下-连接教程**；若已科学上网，直接参考**海外环境下-连接教程**。

## 非海外环境下-连接教程 <a href="#id-0-toc-title" id="id-0-toc-title"></a>

1.登录Proxy302客户端，打开【连接工具】-【辅助工具】，点击下载。

<figure><img src="/files/9EubiXhr1dNUoHvhmSaR" alt=""><figcaption></figcaption></figure>

2.运行该应用。

<figure><img src="/files/xK5V6zQNWW76IThAufMj" alt=""><figcaption></figcaption></figure>

3.等待加载，加载成功后如下图所示，辅助工具启动成功，按最小化使辅助工具在后台运行即可。

<figure><img src="/files/XcjJN8xxyrgfWvQWauw0" alt=""><figcaption></figcaption></figure>

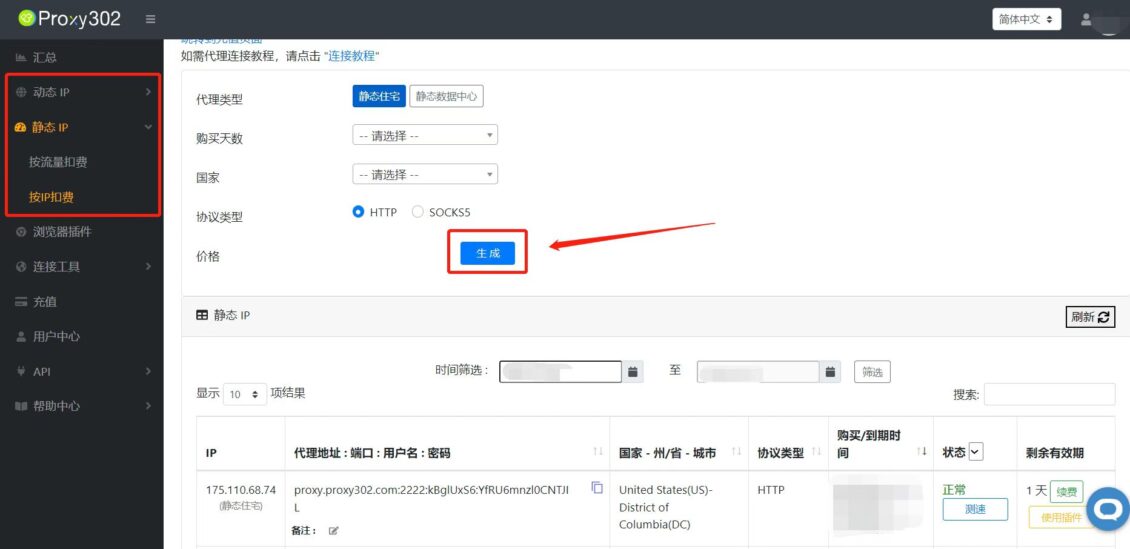
4.选择所需代理类型，生成代理。

<figure><img src="/files/bcWuu6wONDom6pRT1kUC" alt=""><figcaption></figcaption></figure>

5.复制Proxy302代理【地址：端口：用户名：密码】

<figure><img src="/files/WyDfFLwLDb3gaeB7g9E6" alt=""><figcaption></figcaption></figure>

6.登录比特浏览器客户端，打开浏览器窗口，点击创建窗口。

<figure><img src="/files/T4Gp9qPCXJG6rTVeTxND" alt=""><figcaption></figcaption></figure>

7.填写弹框中的代理设置，点击“代理主机”输入框，粘贴代理【地址:端口:用户名:密码】。

<figure><img src="/files/lyt5fjZFvCkZfFM8oDfL" alt=""><figcaption></figcaption></figure>

8.点开辅助工具，复制局域网地址，将局域网地址填入代理主机中。

<figure><img src="/files/CEc8yNLppULVBKQornxp" alt=""><figcaption></figcaption></figure>

9.点击“代理检测”按钮，检查代理是否连接成功。

<figure><img src="/files/9FMhlwn93puCAmIcBLeM" alt=""><figcaption></figcaption></figure>

10.点击“确定”按钮，成功修改代理。

<figure><img src="/files/rN2twADJzMTV5jXuca4f" alt=""><figcaption></figcaption></figure>

11.点击对应序号的“打开”按钮。

<figure><img src="/files/2kaWB7uuDpkyE903GQto" alt=""><figcaption></figcaption></figure>

12.导入账号后，点击打开，即可打开各个不同环境的浏览器。

<figure><img src="/files/QgUuWKYYdk5Xe0nKMnKP" alt=""><figcaption></figcaption></figure>

***

## 海外环境下-连接教程 <a href="#id-1-toc-title" id="id-1-toc-title"></a>

1.登录Proxy302客户端，生成代理。

<figure><img src="/files/4EpQbrgcBSgIZoyWv4yC" alt=""><figcaption></figcaption></figure>

2.复制Proxy302代理【地址:端口:用户名:密码】。

<figure><img src="/files/7RJvNNNaU086vETY0oVi" alt=""><figcaption></figcaption></figure>

3.登录比特浏览器客户端，打开浏览器窗口，点击创建窗口。

<figure><img src="/files/Ju8I14KhaEECwvAgQmcZ" alt=""><figcaption></figcaption></figure>

4.填写弹框中的代理设置，点击“代理主机”输入框，粘贴代理【地址:端口:用户名:密码】。

<figure><img src="/files/4nk4f0t2mfEEK9xkzr0t" alt=""><figcaption></figcaption></figure>

5.点击“代理检测”按钮，检查代理是否连接成功。

<figure><img src="/files/0cDIqpy938BTkcaIYLA8" alt=""><figcaption></figcaption></figure>

6.点击“确定”按钮，成功修改代理。

<figure><img src="/files/iTrrcaYheRH6fVySYLFz" alt=""><figcaption></figcaption></figure>

7.点击对应序号的“打开”按钮。

<figure><img src="/files/LzU4msig4sr9zOBkiVSk" alt=""><figcaption></figcaption></figure>

8.导入账号后，点击打开，即可打开各个不同环境的浏览器。

<figure><img src="/files/75vAykjz762pfQx9Ysu7" alt=""><figcaption></figcaption></figure>


---

# Agent Instructions: Querying This Documentation

If you need additional information that is not directly available in this page, you can query the documentation dynamically by asking a question.

Perform an HTTP GET request on the current page URL with the `ask` query parameter:

```
GET https://doc.bitbrowser.cn/help1/dailiip/ru-he-she-zhi-proxy302-dai-li.md?ask=<question>
```

The question should be specific, self-contained, and written in natural language.
The response will contain a direct answer to the question and relevant excerpts and sources from the documentation.

Use this mechanism when the answer is not explicitly present in the current page, you need clarification or additional context, or you want to retrieve related documentation sections.